 十五、SpringBoot-核心原理
# 1. 事件和监听器
# 1. 生命周期监听
场景:监听应用的生命周期
# 1. 监听器-SpringApplicationRunListener
自定义
SpringApplicationRunListener来监听事件;- 编写
SpringApplicationRunListener实现类 - 在
classpath:META-INF/spring.factories中配置org.springframework.boot.SpringApplicationRunListener=自己的Listener,还可以指定一个有参构造器,接受两个参数(SpringApplication application, String[] args) - springboot 在
spring-boot.jar中配置了默认的 Listener,如下
- 编写

/**
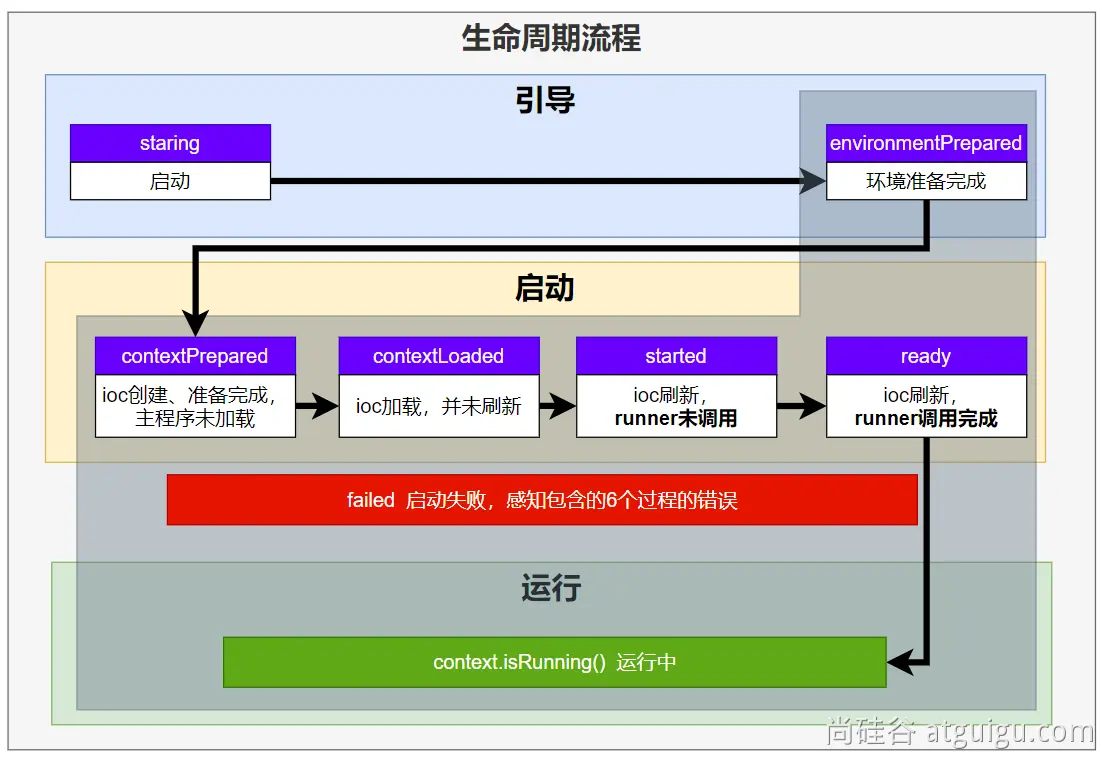
* Listener先要从 META-INF/spring.factories 读到
*
* 1、引导: 利用 BootstrapContext 引导整个项目启动
* starting: 应用开始,SpringApplication的run方法一调用,只要有了 BootstrapContext 就执行
* environmentPrepared: 环境准备好(把启动参数等绑定到环境变量中),但是ioc还没有创建;【调一次】
* 2、启动:
* contextPrepared: ioc容器创建并准备好,但是sources(主配置类)没加载。并关闭引导上下文;组件都没创建,只是创建了ioc容器 【调一次】
* contextLoaded: ioc容器加载。主配置类加载进去了。但是ioc容器还没刷新(我们的bean没创建)。
* =======截止以前,ioc容器里面还没造bean呢=======
* started: ioc容器刷新了(所有bean造好了),但是 runner 没调用。
* ready: ioc容器刷新了(所有bean造好了),所有 runner 调用完了。
* 3、运行
* 以前步骤都正确执行,代表容器running。
*/
2
3
4
5
6
7
8
9
10
11
12
13
14
15
示例:
public class MyAppListener implements SpringApplicationRunListener {

    @Override
    public void starting(ConfigurableBootstrapContext bootstrapContext) {

        System.out.println("=======starting======正在启动=======");
    }

    @Override
    public void environmentPrepared(ConfigurableBootstrapContext bootstrapContext, ConfigurableEnvironment environment) {

        System.out.println("=======environmentPrepared======环境准备完成=======");

    }

    @Override
    public void contextPrepared(ConfigurableApplicationContext context) {
        System.out.println("=======contextPrepared======ioc容器准备完成=======");
    }

    @Override
    public void contextLoaded(ConfigurableApplicationContext context) {
        System.out.println("=======contextLoaded======ioc容器加载完成=======");
    }

    @Override
    public void started(ConfigurableApplicationContext context, Duration timeTaken) {
        System.out.println("=======started======ioc容器启动完成=======");
    }

    @Override
    public void ready(ConfigurableApplicationContext context, Duration timeTaken) {
        System.out.println("=======ready======ioc容器准备就绪=======");
    }

    @Override
    public void failed(ConfigurableApplicationContext context, Throwable exception) {
        System.out.println("=======failed======应用启动失败=======");
    }
}
2
3
4
5
6
7
8
9
10
11
12
13
14
15
16
17
18
19
20
21
22
23
24
25
26
27
28
29
30
31
32
33
34
35
36
37
38
39
40
=======starting======正在启动=======
=======environmentPrepared======环境准备完成=======

  .   ____          _            __ _ _
 /\\ / ___'_ __ _ _(_)_ __  __ _ \ \ \ \
( ( )\___ | '_ | '_| | '_ \/ _` | \ \ \ \
 \\/  ___)| |_)| | | | | || (_| |  ) ) ) )
  '  |____| .__|_| |_|_| |_\__, | / / / /
 =========|_|==============|___/=/_/_/_/
 :: Spring Boot ::                (v3.0.6)

=======contextPrepared======ioc容器准备完成=======
2023-06-08T22:17:35.215+08:00  INFO 2648 --- [           main] c.a.boot3.core.Boot307CoreApplication    : Starting Boot307CoreApplication using Java 17.0.7 with PID 2648 (D:\Workspace\IdeaProjects\spring-boot-3源码\boot3-07-core-study\target\classes started by 74772 in D:\Workspace\IdeaProjects\spring-boot-3源码)
2023-06-08T22:17:35.219+08:00  INFO 2648 --- [           main] c.a.boot3.core.Boot307CoreApplication    : No active profile set, falling back to 1 default profile: "default"
=======contextLoaded======ioc容器加载完成=======
2023-06-08T22:17:35.833+08:00  INFO 2648 --- [           main] o.s.b.w.embedded.tomcat.TomcatWebServer  : Tomcat initialized with port(s): 8080 (http)
2023-06-08T22:17:35.840+08:00  INFO 2648 --- [           main] o.apache.catalina.core.StandardService   : Starting service [Tomcat]
2023-06-08T22:17:35.840+08:00  INFO 2648 --- [           main] o.apache.catalina.core.StandardEngine    : Starting Servlet engine: [Apache Tomcat/10.1.8]
2023-06-08T22:17:35.904+08:00  INFO 2648 --- [           main] o.a.c.c.C.[Tomcat].[localhost].[/]       : Initializing Spring embedded WebApplicationContext
2023-06-08T22:17:35.904+08:00  INFO 2648 --- [           main] w.s.c.ServletWebServerApplicationContext : Root WebApplicationContext: initialization completed in 636 ms
2023-06-08T22:17:36.145+08:00  INFO 2648 --- [           main] o.s.b.w.embedded.tomcat.TomcatWebServer  : Tomcat started on port(s): 8080 (http) with context path ''
2023-06-08T22:17:36.151+08:00  INFO 2648 --- [           main] c.a.boot3.core.Boot307CoreApplication    : Started Boot307CoreApplication in 1.242 seconds (process running for 1.582)
=======started======ioc容器启动完成=======
=======ready======ioc容器准备就绪=======
2
3
4
5
6
7
8
9
10
11
12
13
14
15
16
17
18
19
20
21
22
23
24
25
# 2. 生命周期全流程
# 2. 事件触发时机
# 1. 各种回调监听器
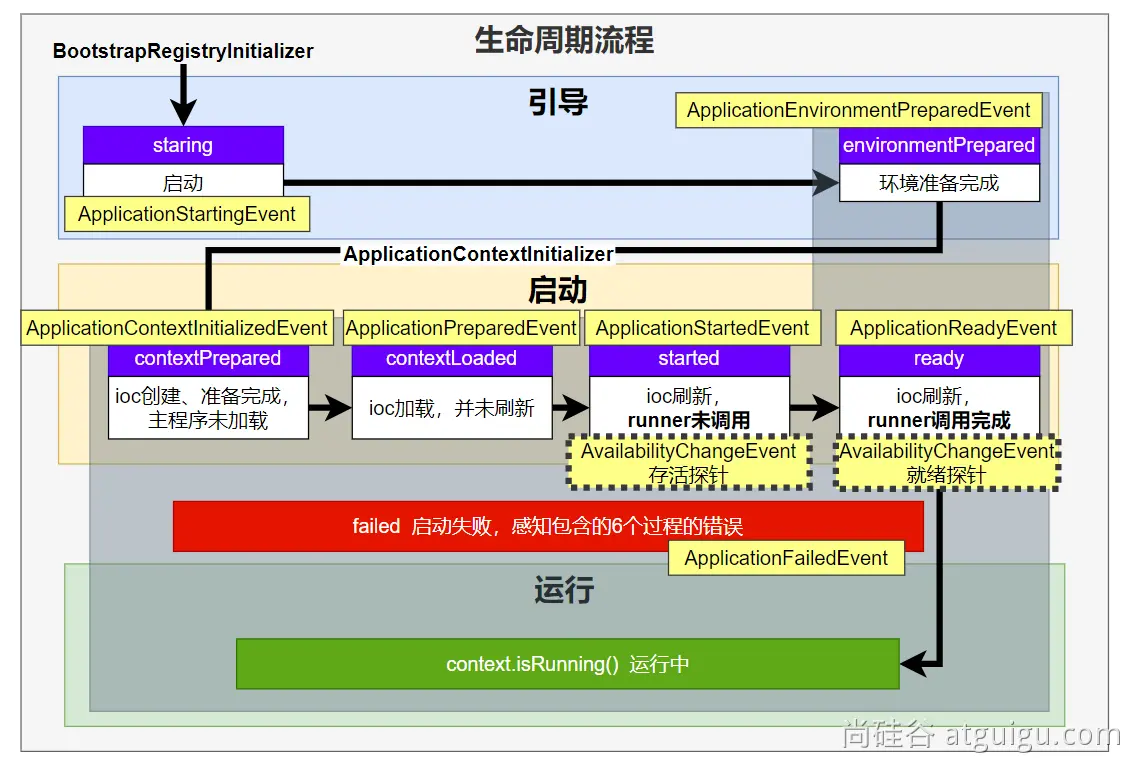
BootstrapRegistryInitializer: 感知特定阶段:感知引导初始化
- 可以在
META-INF/spring.factories中配置
- 创建引导上下文
bootstrapContext的时候触发(staring之前) - application.
addBootstrapRegistryInitializer(); - 场景:
进行密钥校对授权。
- 可以在
ApplicationContextInitializer: 感知特定阶段: 感知ioc容器初始化
- 可以在
META-INF/spring.factories中配置
- application.addInitializers();
- 可以在
ApplicationListener: 感知全阶段:基于事件机制,感知事件。 一旦到了哪个阶段可以做别的事,每个阶段到达之前都会有一些事件发生。配置方式如下:
@Bean或@EventListener:事件驱动
SpringApplication.addListeners(…)或SpringApplicationBuilder.listeners(…)META-INF/spring.factories
SpringApplicationRunListener: 感知全阶段生命周期 + 各种阶段都能自定义操作; 功能更完善。
META-INF/spring.factories
ApplicationRunner: 感知特定阶段:感知应用就绪Ready。卡死应用,就不会就绪
@Bean
CommandLineRunner: 感知特定阶段:感知应用就绪Ready。卡死应用,就不会就绪
@Bean
最佳实战:
- 如果项目启动前做事:
BootstrapRegistryInitializer和ApplicationContextInitializer - 如果想要在项目启动完成后做事:
ApplicationRunner和CommandLineRunner - 如果要干涉生命周期做事:
SpringApplicationRunListener - 如果想要用事件机制:
ApplicationListener
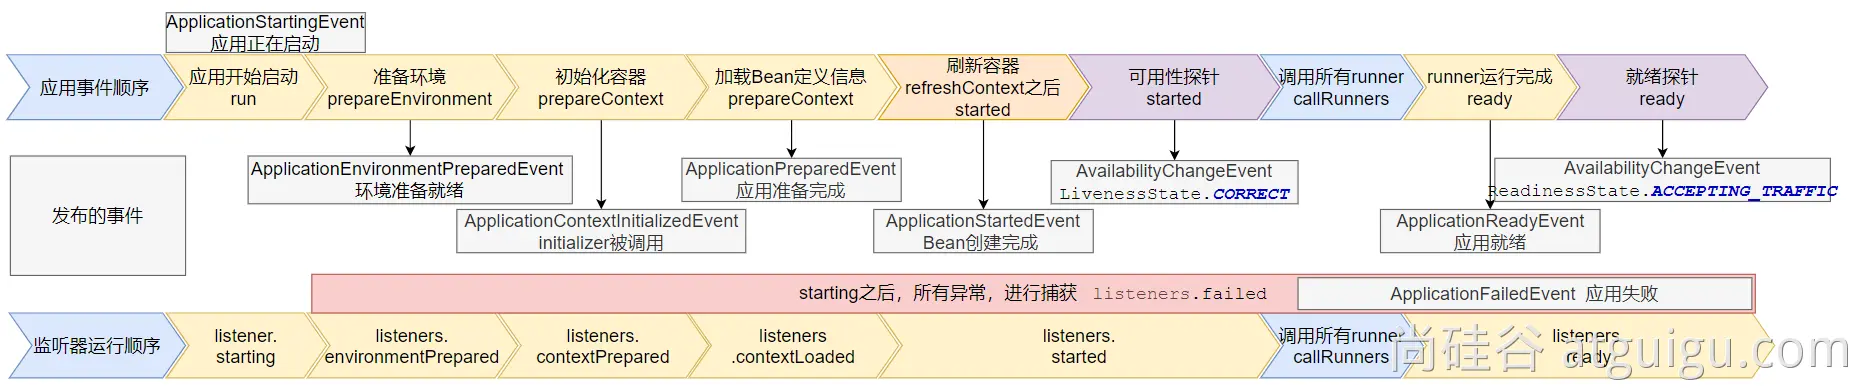
# 2. 完整触发流程
9大事件触发顺序&时机
ApplicationStartingEvent:应用启动但未做任何事情, 除过注册listeners and initializers.ApplicationEnvironmentPreparedEvent: Environment 准备好,但context 未创建.ApplicationContextInitializedEvent: ApplicationContext 准备好,ApplicationContextInitializers 调用,但是任何bean未加载ApplicationPreparedEvent: 容器刷新之前,bean定义信息加载ApplicationStartedEvent: 容器刷新完成, runner未调用
=========以下就开始插入了探针机制============
AvailabilityChangeEvent:LivenessState.CORRECT应用存活; 存活探针ApplicationReadyEvent: 任何runner被调用AvailabilityChangeEvent:ReadinessState.ACCEPTING_TRAFFIC就绪探针,可以接请求ApplicationFailedEvent:启动出错
应用事件发送顺序如下:
感知应用是否存活了:可能进入植物状态,虽然活着但是不能处理请求。
应用是否就绪了:能响应请求,说明确实活的比较好。
# 3. SpringBoot 事件驱动开发
应用启动过程生命周期事件感知(9大事件)、应用运行中事件感知(无数种)。
- 事件发布:
ApplicationEventPublisherAware或注入:ApplicationEventMulticaster - 事件监听:
组件 + @EventListener
原本开发方式如下图,这样后期更改业务时需要在controller中增加对应的调用新业务的代码,比较麻烦
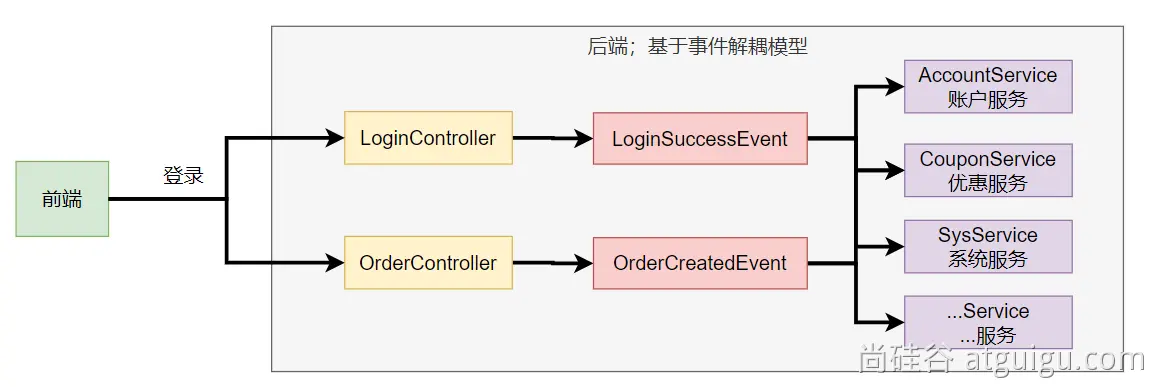
基于事件驱动开发方式如下图,事件发布者只需要发布一个事件,要增加功能时只需要增加对应的事件订阅者就行,不需要修改之前的代码。
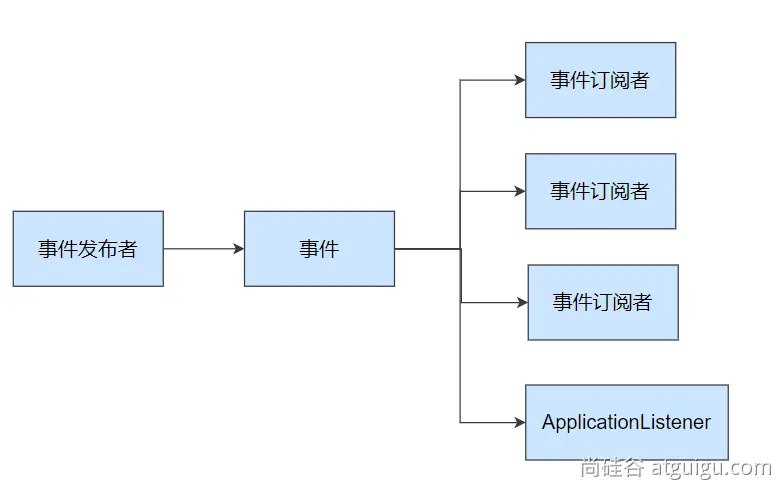
事件发布者
@Service
public class EventPublisher implements ApplicationEventPublisherAware {

    /**
     * 底层发送事件用的组件,SpringBoot会通过ApplicationEventPublisherAware接口自动注入给我们
     * 并不需要标注@Autowired注解
     * 事件是广播出去的。所有监听这个事件的监听器都可以收到
     */
    ApplicationEventPublisher applicationEventPublisher;

    /**
     * 所有事件都可以发
     * @param event
     */
    public void sendEvent(ApplicationEvent event) {
        //调用底层API发送事件
        applicationEventPublisher.publishEvent(event);
    }

    /**
     * 项目启动时会被自动调用,把真正发事件的底层组组件给我们注入进来
     * @param applicationEventPublisher event publisher to be used by this object
     */
    @Override
    public void setApplicationEventPublisher(ApplicationEventPublisher applicationEventPublisher) {
        this.applicationEventPublisher = applicationEventPublisher;
    }
}
2
3
4
5
6
7
8
9
10
11
12
13
14
15
16
17
18
19
20
21
22
23
24
25
26
27
28
事件
public class LoginSuccessEvent  extends ApplicationEvent {

    /**
     *
     * @param source  代表是谁登录成了
     */
    public LoginSuccessEvent(UserEntity source) {
        super(source);
    }
}
2
3
4
5
6
7
8
9
10
11
事件订阅者(以下两种写法都行)
@Order(2)
@Service
// 实现一个ApplicationListener接口
public class AccountService implements ApplicationListener<LoginSuccessEvent> {

    public void addAccountScore(String username){
        System.out.println(username +" 加了1分");
    }

    @Override
    public void onApplicationEvent(LoginSuccessEvent event) {
        System.out.println("=====  AccountService  收到事件 =====");

        UserEntity source = (UserEntity) event.getSource();
        addAccountScore(source.getUsername());
    }
}

@Service
public class CouponService {

    @Order(1)
    @EventListener
    // 在onEvent方法上标注@EventListener注解
    public void onEvent(LoginSuccessEvent loginSuccessEvent){
        System.out.println("===== CouponService ====感知到事件"+loginSuccessEvent);
        UserEntity source = (UserEntity) loginSuccessEvent.getSource();
        sendCoupon(source.getUsername());
    }

    public void sendCoupon(String username){
        System.out.println(username + " 随机得到了一张优惠券");
    }
}
2
3
4
5
6
7
8
9
10
11
12
13
14
15
16
17
18
19
20
21
22
23
24
25
26
27
28
29
30
31
32
33
34
# 2. 自动配置原理
# 1. 入门理解
应用关注的三大核心:场景、配置、组件
# 1. 自动配置流程
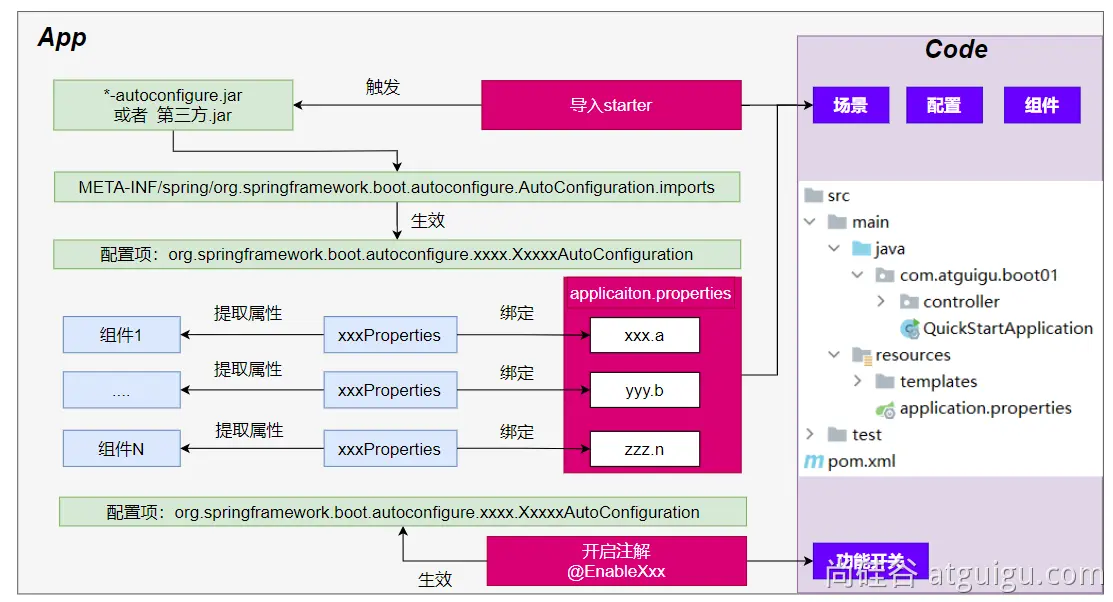
导入
starter依赖导入
autoconfigure寻找类路径下
META-INF/spring/org.springframework.boot.autoconfigure.AutoConfiguration.imports文件启动,加载所有
自动配置类xxxAutoConfiguration- 给容器中配置功能
组件 组件参数绑定到属性类中。xxxProperties属性类和配置文件前缀项绑定@Contional派生的条件注解进行判断是否组件生效
- 给容器中配置功能
效果:
- 修改配置文件,修改底层参数
- 所有场景自动配置好直接使用
- 可以注入SpringBoot配置好的组件随时使用
# 2. SPI机制
- Java中的SPI(Service Provider Interface)是一种软件设计模式,用于在应用程序中动态地发现和加载组件。SPI的思想是,定义一个接口或抽象类,然后通过在classpath中定义实现该接口的类来实现对组件的动态发现和加载。
- SPI的主要目的是解决在应用程序中使用可插拔组件的问题。例如,一个应用程序可能需要使用不同的日志框架或数据库连接池,但是这些组件的选择可能取决于运行时的条件。通过使用SPI,应用程序可以在运行时发现并加载适当的组件,而无需在代码中硬编码这些组件的实现类。
- 在Java中,SPI的实现方式是通过在
META-INF/services目录下创建一个以服务接口全限定名为名字的文件,文件中包含实现该服务接口的类的全限定名。当应用程序启动时,Java的SPI机制会自动扫描classpath中的这些文件,并根据文件中指定的类名来加载实现类。 - 通过使用SPI,应用程序可以实现更灵活、可扩展的架构,同时也可以避免硬编码依赖关系和增加代码的可维护性。
以上回答来自ChatGPT-3.5
在SpringBoot中,SPI机制体现在META-INF/spring/org.springframework.boot.autoconfigure.AutoConfiguration.imports文件中
作业:写一段java的spi机制代码
# 3. 功能开关
自动配置:全部都配置好,什么都不用管。自动批量导入
- 项目一启动,spi文件中指定的所有都加载,无法手动干预
@EnableXxxx:手动控制哪些功能的开启; 手动导入。- 开启xxx功能
- 都是利用 @Import 把此功能要用的组件手动导入进去
# 2. 进阶理解
# 1. @SpringBootApplication
# @SpringBootConfiguration
就是: @Configuration ,容器中的组件,配置类。spring ioc启动就会加载创建这个类对象
# @EnableAutoConfiguration:开启自动配置
开启自动配置
@AutoConfigurationPackage:扫描主程序包:加载自己的组件
- 利用
@Import(AutoConfigurationPackages.Registrar.class)想要给容器中导入组件。 - 把主程序所在的包的所有组件导入进来。
- 为什么SpringBoot默认只扫描主程序所在的包及其子包
@Import(AutoConfigurationImportSelector.class):加载所有自动配置类:加载starter导入的组件
		List<String> configurations = ImportCandidates.load(AutoConfiguration.class, getBeanClassLoader())
			.getCandidates();
2
扫描SPI文件:META-INF/spring/org.springframework.boot.autoconfigure.AutoConfiguration.imports
# @ComponentScan
组件扫描:排除一些组件(哪些不要)
排除前面已经扫描进来的
配置类、和自动配置类。
@ComponentScan(excludeFilters = { @Filter(type = FilterType.CUSTOM, classes = TypeExcludeFilter.class),
      @Filter(type = FilterType.CUSTOM, classes = AutoConfigurationExcludeFilter.class) })
2
# 2. 完整启动加载流程
生命周期启动加载流程
在创建完ioc容器后,首先要创建Bean工厂,工厂准备的时候会加载自动配置类,扫描主程序以及子包,之后创建一个个Bean

# 3. 自定义starter
场景:抽取聊天机器人场景,它可以打招呼。
效果:任何项目导入此starter都具有打招呼功能,并且问候语中的人名需要可以在配置文件中修改
- 创建
自定义starter项目,引入spring-boot-starter基础依赖
- 创建
- 编写模块功能,引入模块所有需要的依赖。
- 编写
xxxAutoConfiguration自动配置类,帮其他项目导入这个模块需要的所有组件
- 编写
- 编写配置文件
META-INF/spring/org.springframework.boot.autoconfigure.AutoConfiguration.imports指定启动需要加载的自动配置
- 编写配置文件
- 其他项目引入即可使用
# 1. 业务代码
配置属性类
@ConfigurationProperties(prefix = "robot")  //此属性类和配置文件指定前缀绑定
@Component
@Data
public class RobotProperties {

    private String name;
    private String age;
    private String email;
}
2
3
4
5
6
7
8
9
自定义配置有提示。导入以下依赖重启项目,再写配置文件就有提示
<!--导入配置处理器,配置文件自定义的properties配置都会有提示-->
<dependency>
    <groupId>org.springframework.boot</groupId>
    <artifactId>spring-boot-configuration-processor</artifactId>
    <optional>true</optional>
</dependency>
2
3
4
5
6
# 2. 基本抽取
创建starter项目,把公共代码需要的所有依赖导入
把公共代码复制进来
自己写一个
RobotAutoConfiguration,给容器中导入这个场景需要的所有组件为什么这些组件默认不会扫描进去?
因为starter所在的包和引入它的项目的主程序所在的包不是父子层级
//给容器中导入Robot功能要用的所有组件
@Import({RobotProperties.class, RobotService.class})
@Configuration
public class RobotAutoConfiguration {

    @Bean //把组件导入到容器中
    public RobotController robotController(){
        return new RobotController();
    }

}
1
2
3
4
5
6
7
8
9
10
11别人引用这个
starter,直接导入这个RobotAutoConfiguration,就能把这个场景的组件导入进来@Import(RobotAutoConfiguration.class) @SpringBootApplication //主程序类 public class Boot306FeaturesApplication { public static void main(String[] args) { SpringApplication application = new SpringApplication(Boot306FeaturesApplication.class); application.run(args); } }1
2
3
4
5
6
7
8
9功能生效。
测试编写配置文件
- 需要写到主程序配置文件下
# 3. 使用@EnableXxx机制抽取
取代了@Import,直接加个注解就能使用功能
@Retention(RetentionPolicy.RUNTIME)
@Target({ElementType.TYPE})
@Documented
@Import(RobotAutoConfiguration.class)
public @interface EnableRobot {


}
2
3
4
5
6
7
8
别人引入starter需要使用 @EnableRobot开启功能
# 4. 完全自动配置
- 依赖SpringBoot的SPI机制
- META-INF/spring/org.springframework.boot.autoconfigure.AutoConfiguration.imports 文件中编写好我们自动配置类的全类名即可
- 项目启动,自动加载我们的自动配置类